My Home networking
Table of Contents
I this blog post, I will be sharing how the network infrastructure at my home evolved over the years due to differing requirements and some tips on to tackle different wifi dead zones within your house. There are some affiliate links in this post, if you are interested in the products, you can use the links to support me.
Initial Setup #
In the beginning, when my family just started using Telecom provided routers, we routinely run into blackout areas within our house where we cannot get wifi signal.

At that point of time, we were still at the tip of the iceberg for our home networking solution. The first solution that we thought of was to get a better router.
Upgrading the router #
During our trip to the nearest challenger store, the store clerk told use that if we get the Asus RT-AC5300, it will be able to improve the signal and make it available everywhere in our house.

Believing the store clerk, we bought the router and went home to test it out. The router did improve the current situation that we had.
For anyone who wants to upgrade to this router
I will recommend one of the following instead
- Asus ROG GT-AX11000
- ASUS ROG GT-AX6000
These are the newer models with supports Wifi 6 (Instead of Wifi 5).
However, we started to have stability issues near the edge of the wifi signal. During heavy use, the wifi towards the further away rooms has frequent signal drops and even fail to connect sometimes.
This mainly affected me as I am usually the one who were using the wifi at the further away rooms.
Different router placements #
As the issues were just affecting the edges of the signal range, we decided to try out a different router placement in the house. Initially, the router was placed near the living room as that was the place where the telecom provided router was placed.

For context, this is the layout of my house at that time. Initially, the router was placed in the living room near the TV (Grey R).
After that, we decided to move it into the corridor nearer to the room at the far end (Blue R).
Why did it help?
By moving the router from the TV area to the corridor, we were able to reduce the number of walls that the signal has to go through. As a result, the signal was able to reach the further away rooms with less interference.
This did improve the connectivity issues that we were facing. However, the latency was inconsistent and not ideal for time sensitive applications like Video calls and Online Gaming.
Power Line/Wifi Extender #
As we have already gotten a really good router (at that time), we felt that getting another router is not a practical solution to the problem. We decided to look into other ways to get the signal to the further away rooms.
There were 2 main solutions that we found.
- Wifi Extender
- Power line
Let us go through each of them.
Wifi Extender #
I could not find the exact model of the Wifi Extender that we used.

It is similar to something like the TP Link TL-WA855RE. It was placed between the router and the further away rooms to boost the wifi signal.
How it works
- The wifi extender connects to the Wifi signal from the router.
- The extender emits its own Wifi signal.
- We connect to the extender’s Wifi signal.
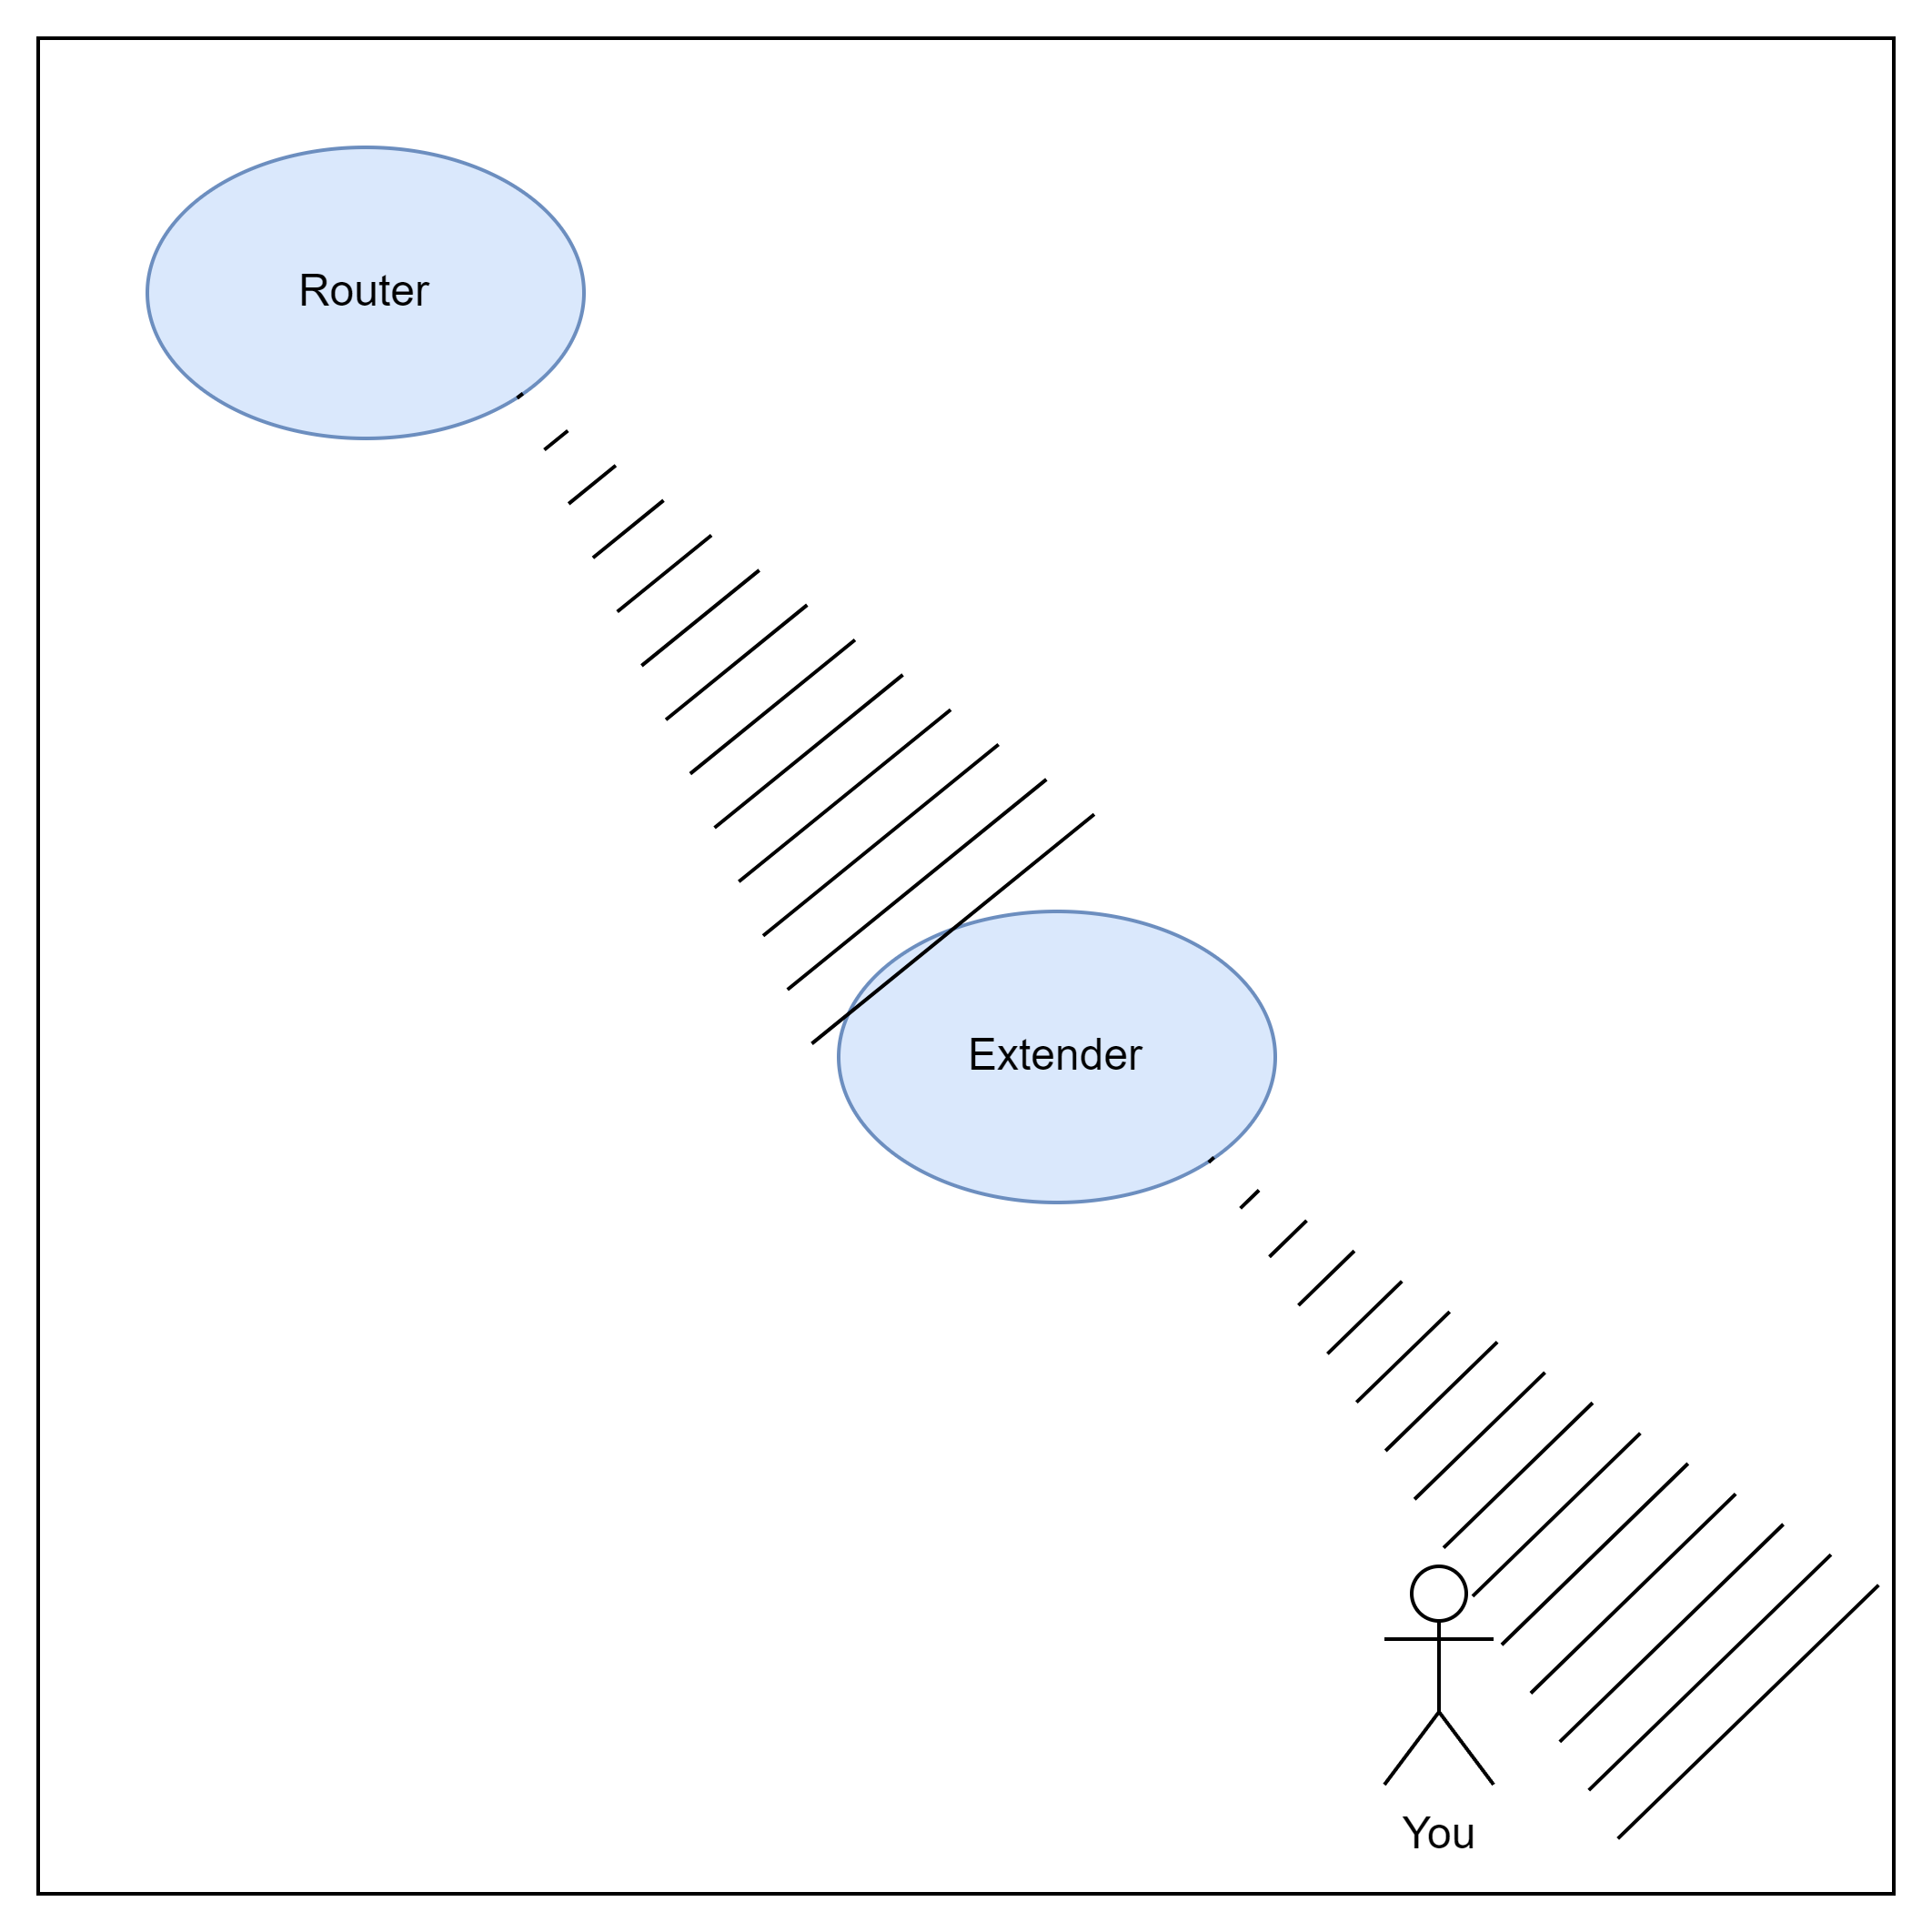
Here is a diagram to illustrate what is happening when we connect to the extender.
When we connect to the extender’s Wifi signal, we are actually indirectly connecting to the router’s Wifi signal.
This effectively extends the range of the router’s Wifi signal. Whenever we send data to the router, the extender will send the data to the router on our behalf and vice versa.
Issues
Although this looks good on paper, there are some issues that we faced when using this solution.
The latency became higher and the connection through the extender is still unstable although we have a stronger signal.
Previously, when we connected to the router, there were only 2 devices in the connection. However, when we connect to the extender, there are 3 devices in the connection. Instead of sending to the router directly, we have to send the data to the extender first, then the extender will send the data to the router. This adds an additional step in the process and increases the latency.
Advise
For anyone who wants to use a wifi extender, I would recommend doing the following:
- Place the extender nearer to the router to ensure that the extender has a strong signal.
- Only use the extender for devices that are not time sensitive/do not require high speed. (e.g. Smart TV, IoT devices, etc.)
Power line #

For the power line, we used the AV500 Power line Adapter Starter Kit. This worked well for us as the rooms that we wanted to connect to the network were all connected to the same power line.
So this was the solution that we used in a long while.
How it works
Similar to the Wifi Extender, the power line adapter connects to the router and emits its own Wifi signal.
- Power line Connect to Router via Ethernet
- Power line emits signal within the electrical wiring
- The other power line adapts the signal from the electrical wiring and passes it to the ethernet port / emits its own Wifi signal.
- We connect to the power line adapter’s Wifi signal / through ethernet.
- The power line adapter sends the data to the router through the electrical wiring.
Here is a diagram to illustrate what is happening when we connect to the extender.
When we connect to the power line adapter’s Wifi signal, we are actually indirectly connecting to the router’s signal similar to the Wifi Extender.
However, there is an added layer of stability as the power line adapter is connected to the router via ethernet instead of Wifi.
Speed wise, it has a similar speed to connecting to the router wifi directly, but with a higher latency.
Issues
Similar to the Wifi Extender, there are some downsides to using the power line adapter.
Similar to the Wifi Extender, the latency is higher than connecting to the router directly as we are adding an additional step in the process. However, the latency is lower than the Wifi Extender.
It is susceptible to interference from other electrical appliances. This is because the power line adapter uses the electrical wiring to transmit the signal. If there are other electrical appliances that on path of the electrical wiring, it will interfere with the signal.
Advise
For anyone who wants to use a power line adapter, I would recommend doing the following:
- Place to powerline away from other electrical appliances with high power consumption. (IE: Microwave, Washing Machine, etc.)
- Place the powerline directly into a power socket instead of using an extension cord. This is to reduce the interference from the extension cord.
Asus AI Mesh #
After moving house again, the powerline solution was not scalable as there were even more rooms which were our of range from the router.
However, we have more ethernet wirings in the wall.
Instead of having a single router, with the ethernet wirings, we can have multiple routers to cover the whole house instead.
We can add multiple routers to the network and have them work together to provide a single Wifi network.
As we already have an Asus router, we decided to get another Asus router to try out the Asus AI Mesh feature.
What is Asus AI Mesh
According to the Official AI Mesh website, AI Mesh is a feature that allows you to connect multiple Asus routers together to form a single Wifi network. This means that we can have 2 different routers transmitting the same Wifi signal.
When we move from one area of the house to another, the device will automatically switch to the router with the stronger signal.
If any single one of the routers go down, there will be no downtime as the other routers will be able to take over the signal.
How it works
Asus AI Mesh works by having one of the routers as the main router and the other routers as the nodes.
The main router will be connected to the internet and the nodes will be connected to the main router via ethernet or Wifi.
I recommend connecting the nodes to the main router via ethernet as the connection will be more stable.
The AI Mesh uses the ethernet/Wifi as a back haul to communicate with the main router and each other.
Issues
The main issue that we faced is that our devices like to hold on to the signal from any one of the router even though the signal to the other router is stronger.
This might have to do with the tuning of the router transmit power. As we were unsure on how to adjust the transmit power for the optimal signal, we ended up not using the AI mesh and using separate SSIDs instead.
The Unifi Ecosystem #
This leads us to the current setup that we have using the Unifi Ecosystem. After some time, we felt that our wifi needed an upgrade as switching between the routers was not as seamless as we wanted it to be.
As a result, we ended up using the Unifi Ecosystem to solve our problems. It is a software defined networking solution that allows us to have a single Wifi network across the whole house.
The router and the access points are separate, allowing us to place the access points at the optimal location for the best signal and using the router to coordinate the access points.
We used the following to cover the whole house:


How it works
The Unifi Dream Machine Pro is the router that is connected to the internet. It is also the controller for the whole network.
The AP U6 Long Range and the AP AC Mesh Pro are the access points that are connected to the Unifi Dream Machine Pro.
The Unifi Dream Machine Pro will coordinate the access points to provide a single Wifi network across the whole house.
We can also define as many Wifi networks as we want and assign them to different VLANs/Subnets. This allows us to scale as much as we want and have different networks for different purposes.
If there are any future dead zones, we can just add another access point to the network and the Unifi Dream Machine Pro will automatically coordinate the access points to provide a single Wifi network across the whole house.
Conclusion #
This is the current setup that I have at home, and I am really happy with it. The solution that we ended up with might not be suitable for everyone, but it works for us.
Depending on your requirements, you can consider the solutions that we had at each step of the way.
I hope that this had been helpful for you guys who are looking for a solution to your home networking problems.
Links #
Technology #
Products #
- Dlink DIR-850L Official Website
- Asus RT-AC5300 Official Website
- Asus ROG GT-AX6000 Official Website
- Asus ROG GT-AX11000 Official Website
- DLink AC1200 router.
- Unifi Dream Machine Pro
- AP U6 Pro
- AP AC Mesh Pro